AboutIn the Lab

Import Records

COMPANY:

LogicGate

SUMMARY

I redesigned Risk Cloud’s importer to improve data upload success and implemented a communicative error handling UX to guide users in fixing errors.

Metrics Impacted

Inability to import data caused customer frustration and wasted service hours

At some point within a customer’s journey using Risk Cloud, they will inevitably come across the need to import records into Risk Cloud. Some customers may need to do this only once, while others require weekly imports.

Technically, an import feature did exist as a self serve option, but by and large, customers were unable to successfully import records due to a myriad of UX problems and technical limitations.

As a result, many customers often opted to pay for professional service hours to import from an internal tool. This was an enormous time sink for internal service members and a major frustration/cost for users.

Import users walked into a lack of context, awkward UI, and overall bad process design

The UI presented to the user was a scatter of information.

Instructions were both unclear in copy and placed in unintuitive areas.

The process design was impossible to follow linearly and individual steps were laid out in an awkward 50/50 layout.

3/5 steps in this UX involve creating a mysterious object called a layout, only for it to be renamed to “CSV Template”, and hidden away in a tiny undiscoverable button.

The current importer and its UX flaws.
User FLOW

Simplifying the process design

The first issue I tackled was untangling the convoluted five-step process. My goal was to simplify the process and batch actions into simple understandable steps. The result was a simplified three-step wizard process. Each of these steps captured specific micro actions that logically align with the overarching task, making the process much more manageable. Additionally, I designed alternative advanced paths for returning/advanced users to cater to cater to speed up their workflows.

Users could now easily grasp the importer's functionality by looking at the three major steps, reducing the complexity and confusion that previously existed. By breaking down the process into manageable segments, they experienced less overwhelm and could see how each action contributed to their ultimate goal of importing. This not only improved user comprehension but also enhanced overall user satisfaction and efficiency in using the importer.

Version 2's user flow heavily simplified the importer process design.
Comprehensive import user flow. Click on the image above for an expanded view.

Step 1: Starting off nice and easy

In the first step, users start off with the simple task of identifying where they want to send their import to, priming the user to understand which part of their application they are impacting. In the previous version, this step existed as the fourth step, which felt out of place. This also gives us context to filter down a list of the specific data fields that pertain specifically to that destination, removing the need for users to sift through unnecessary data.

Step 1 UI: Users simply select where they want to import data into.

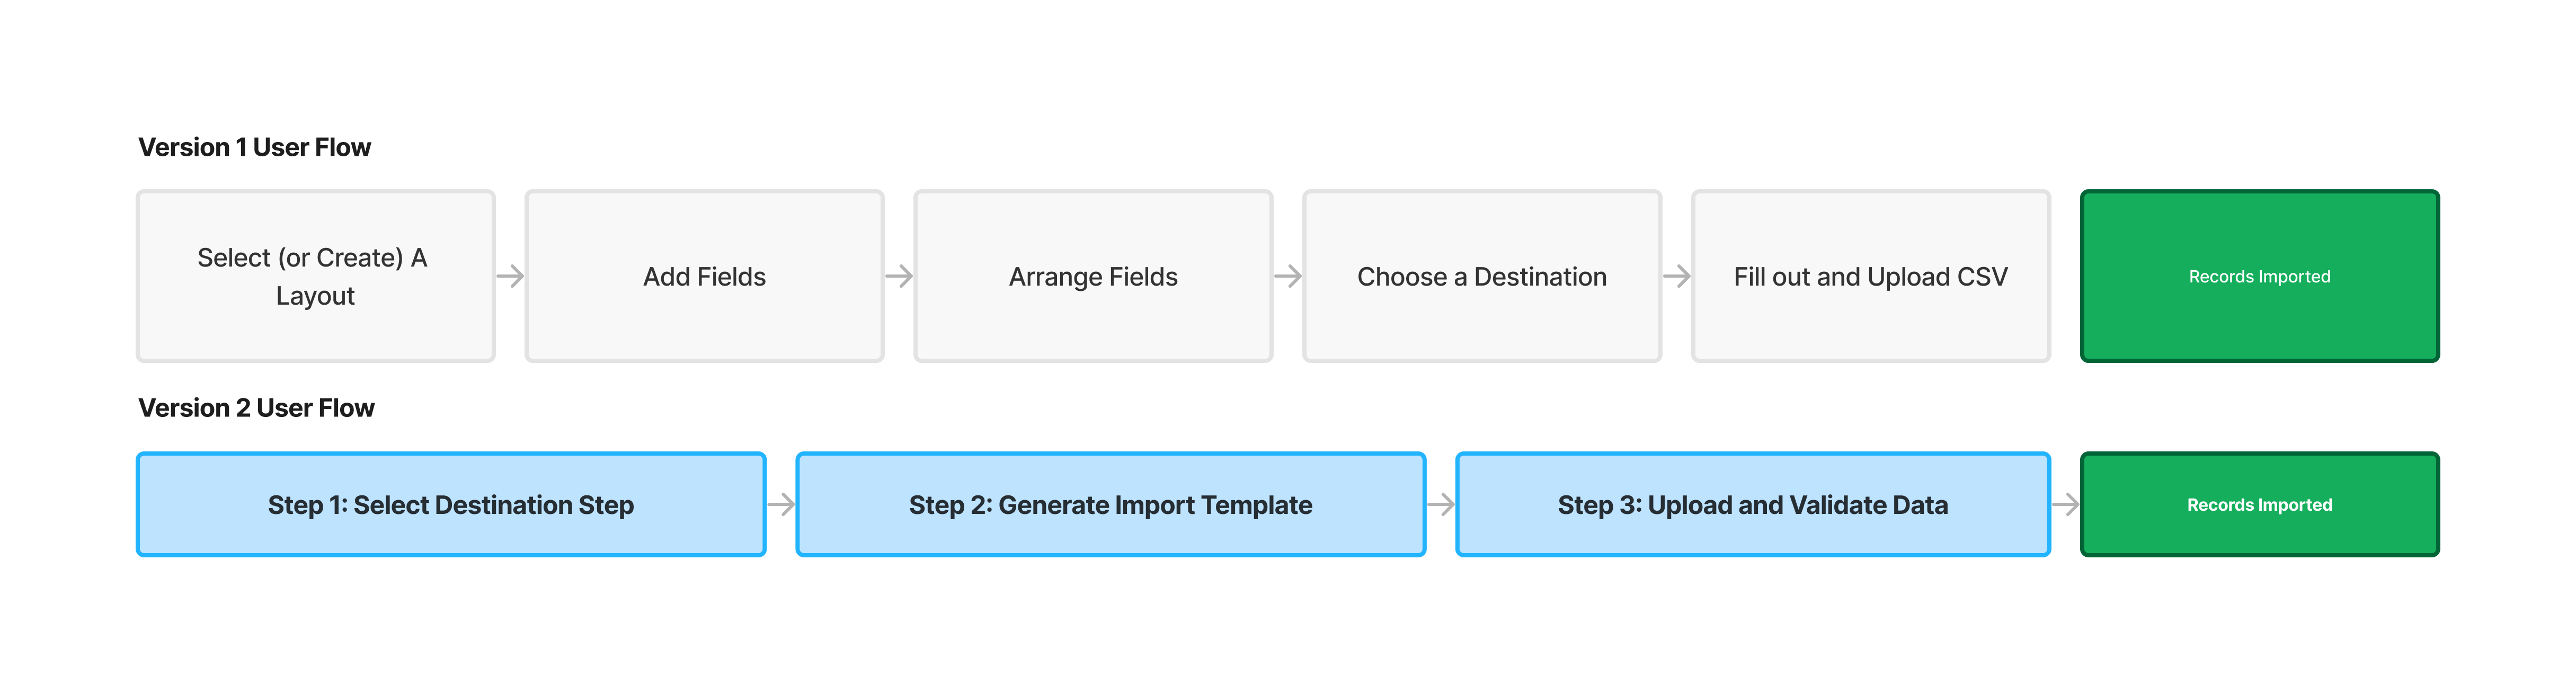
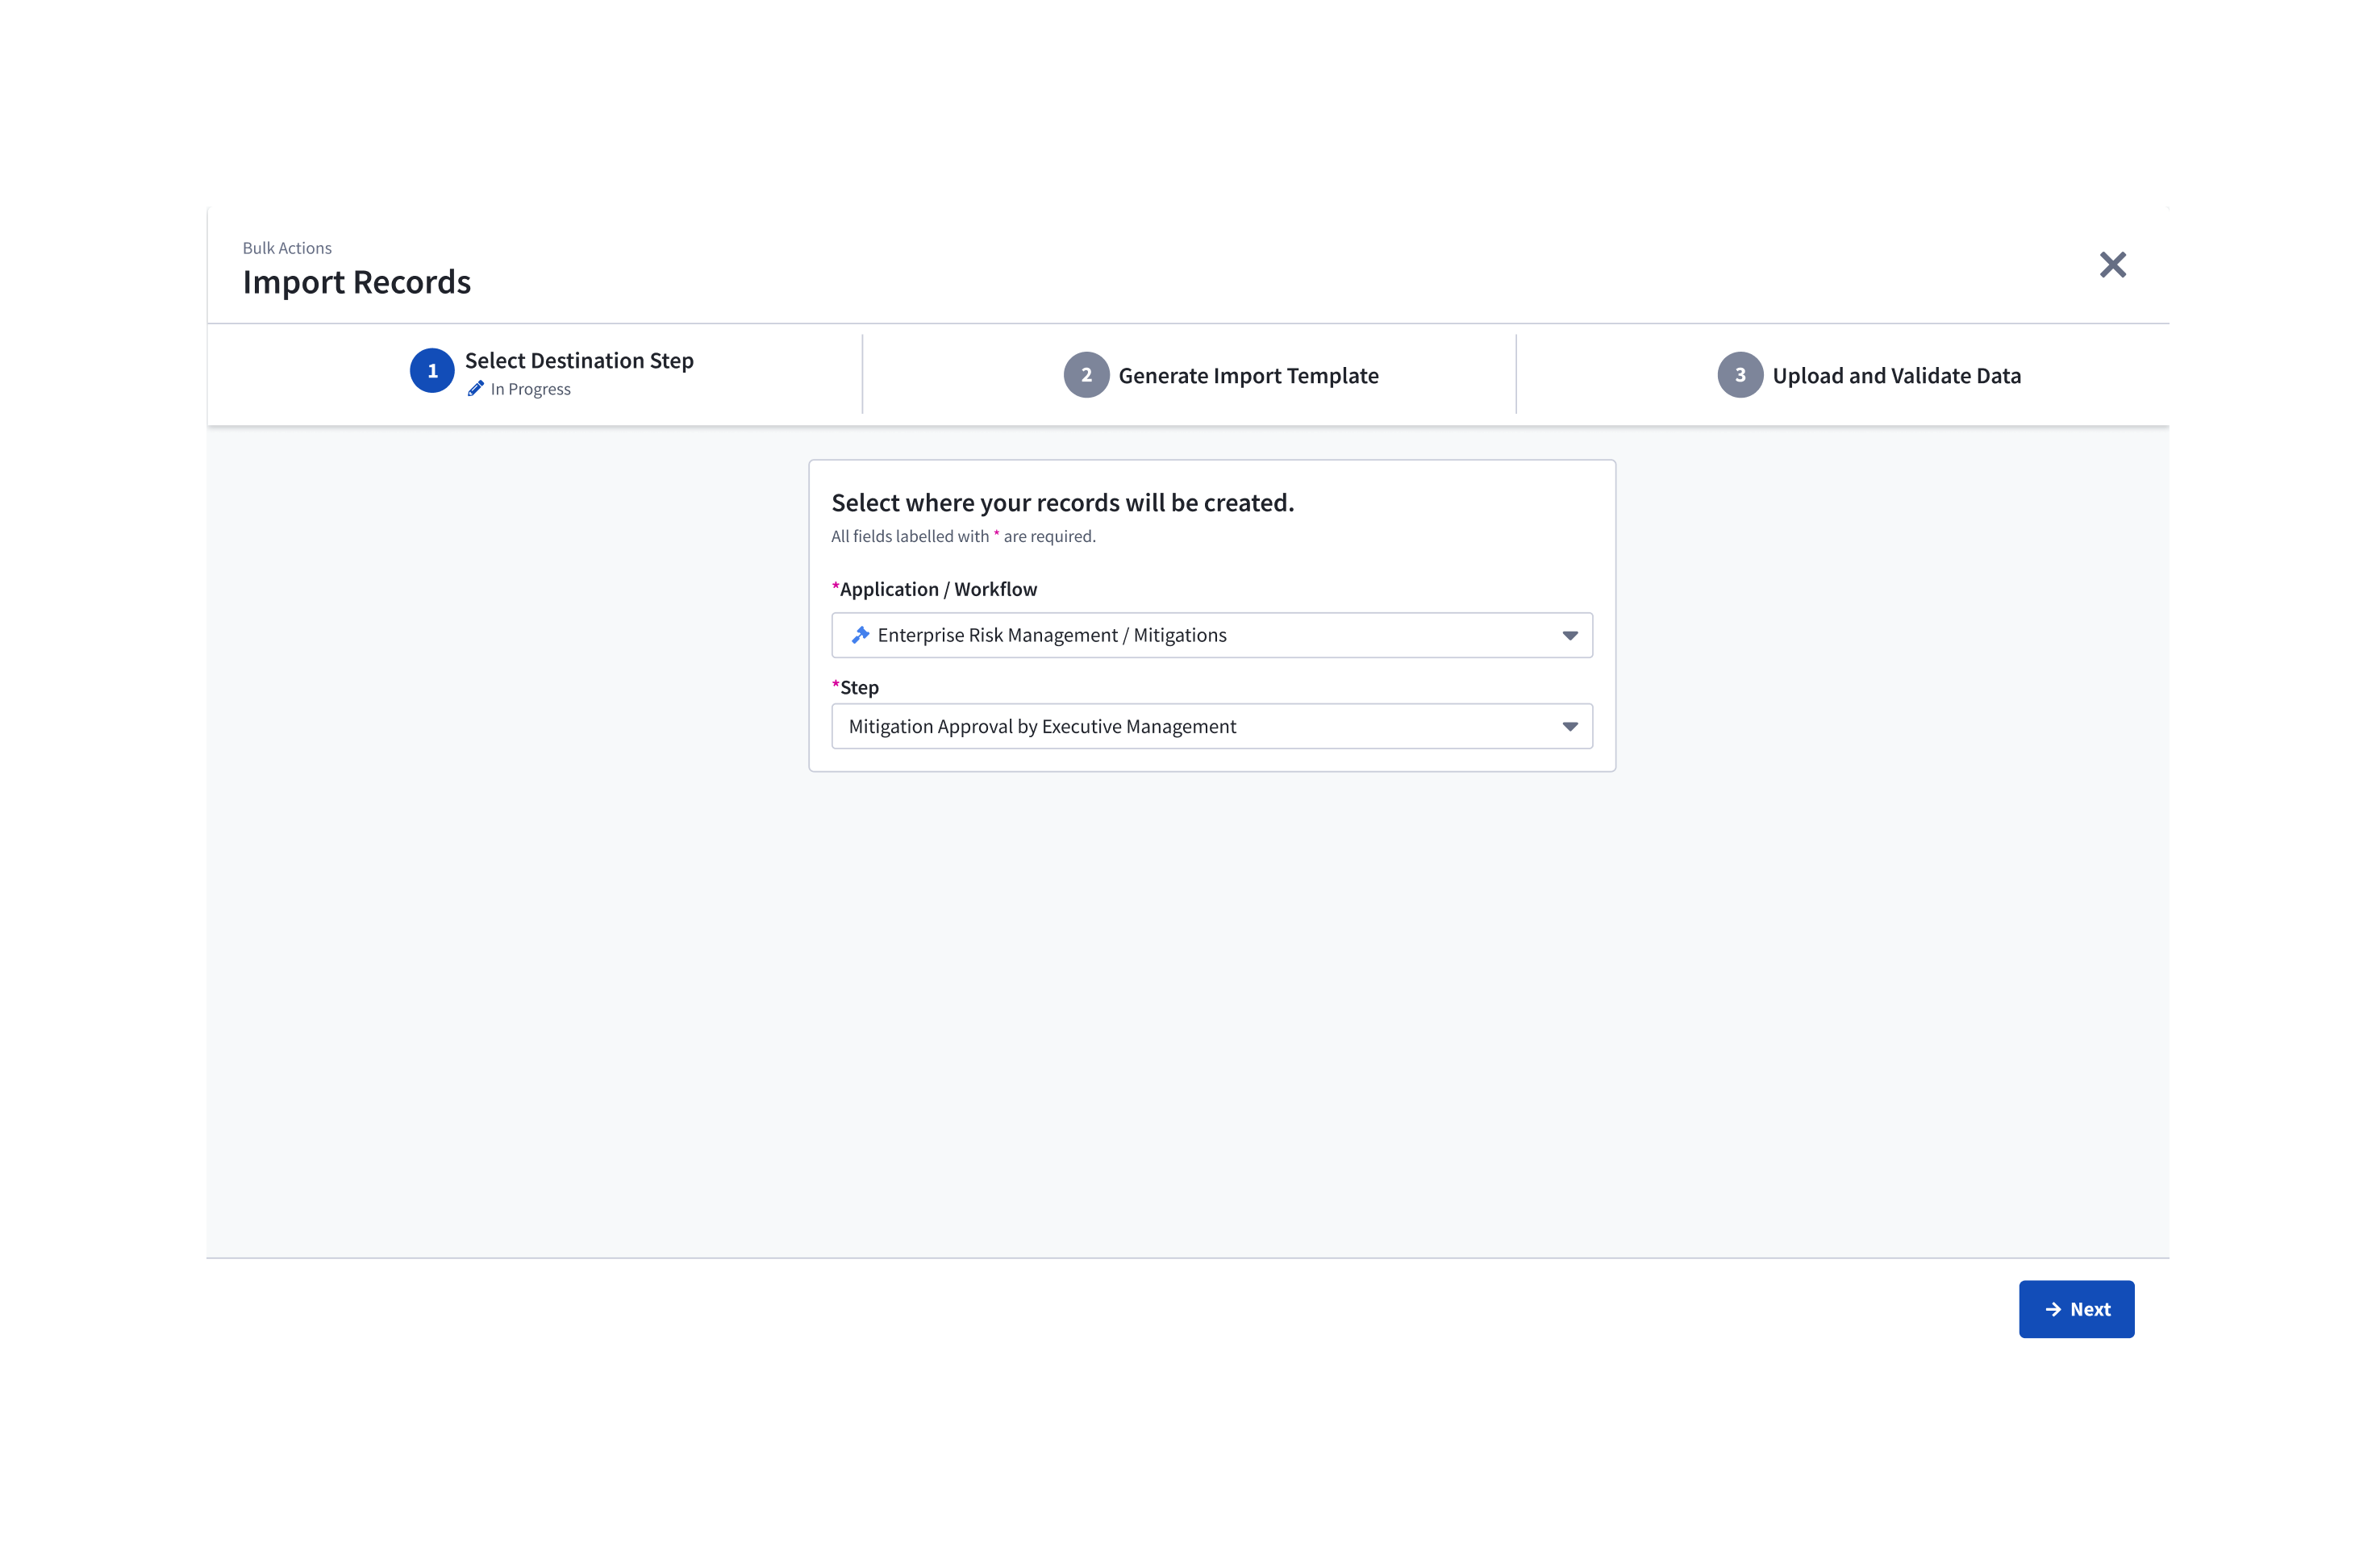
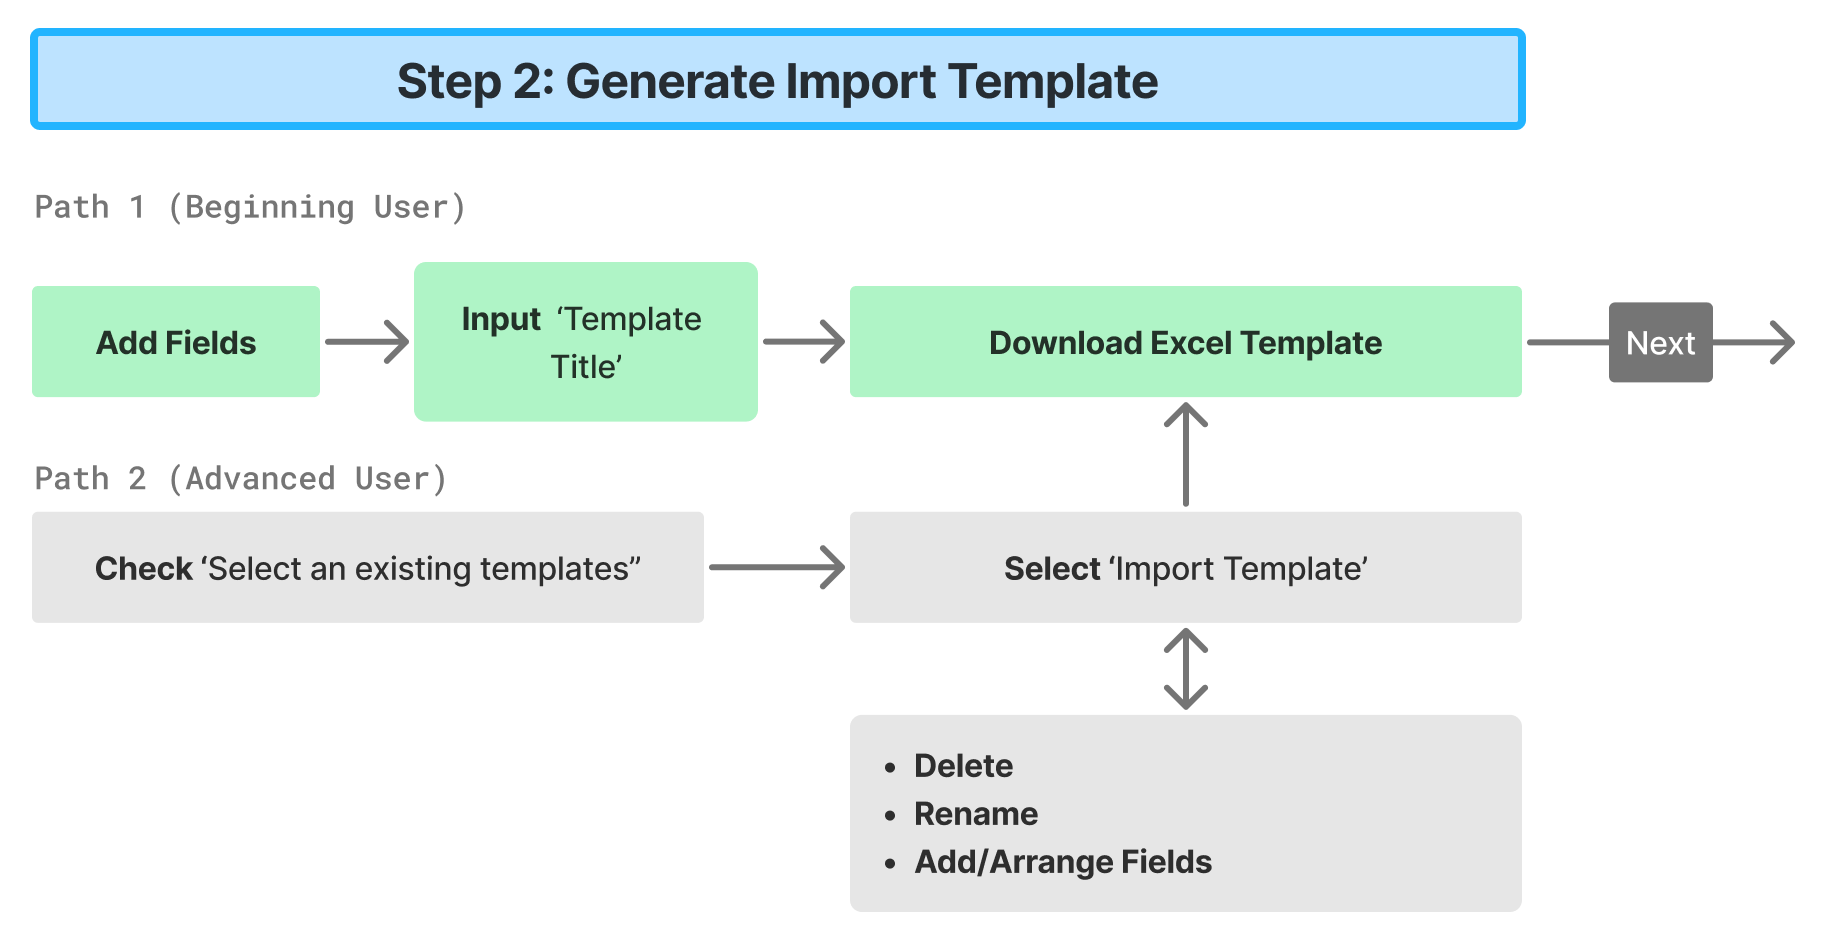
Step 2: A path for the beginner, a path for the advanced

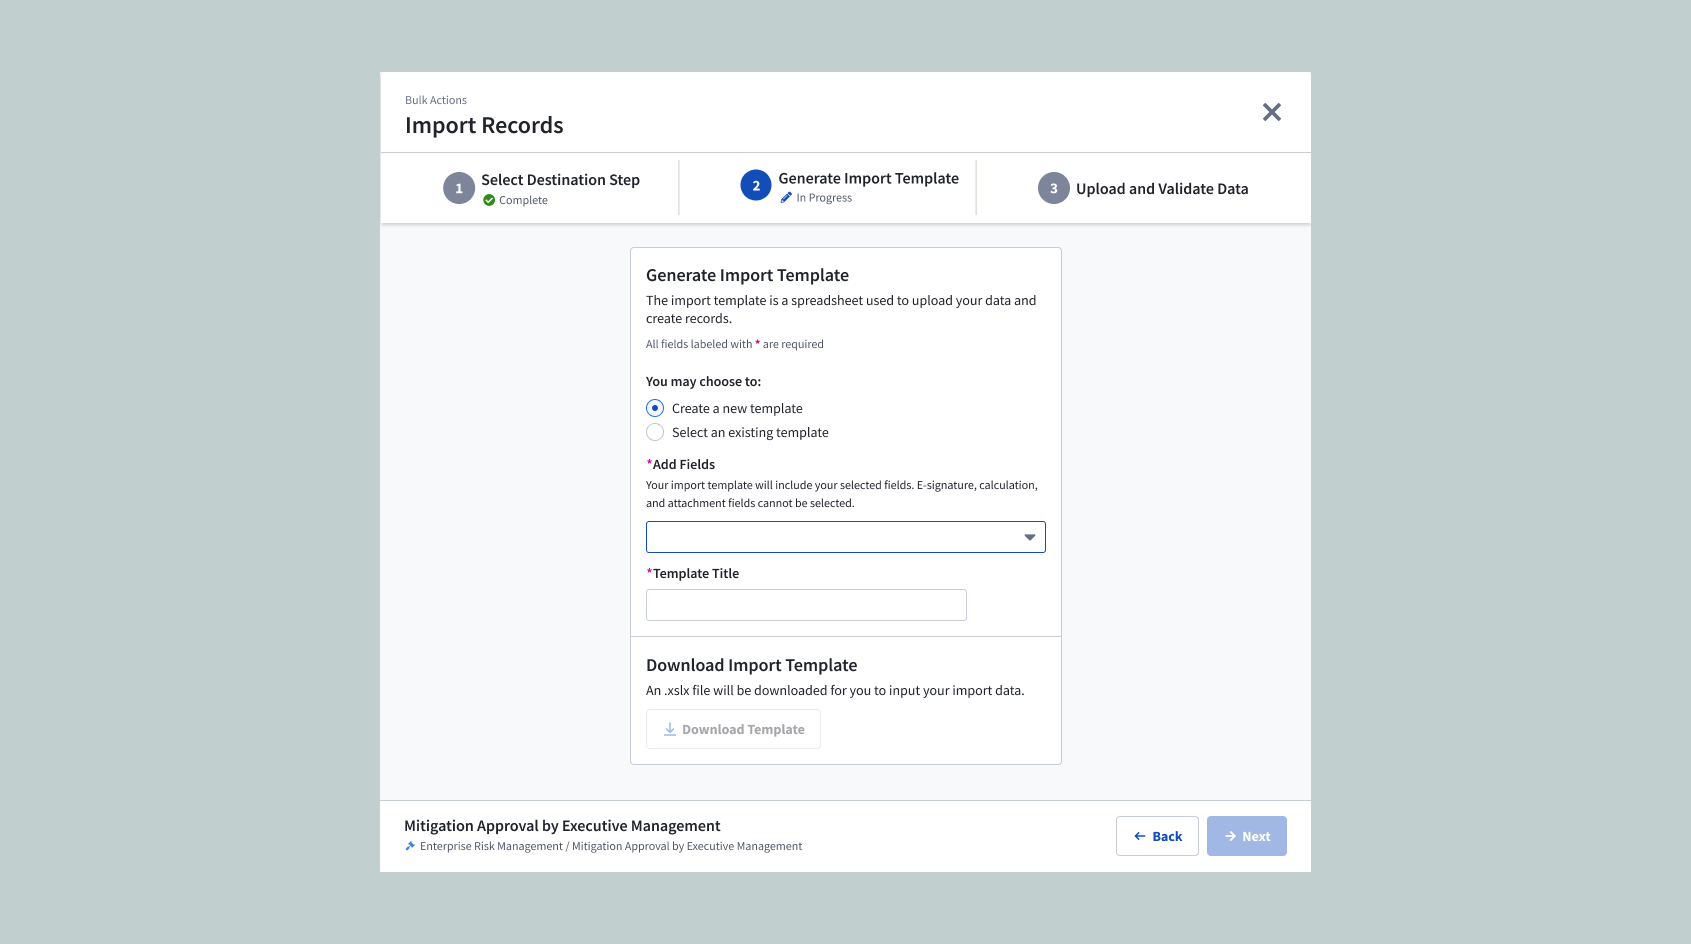
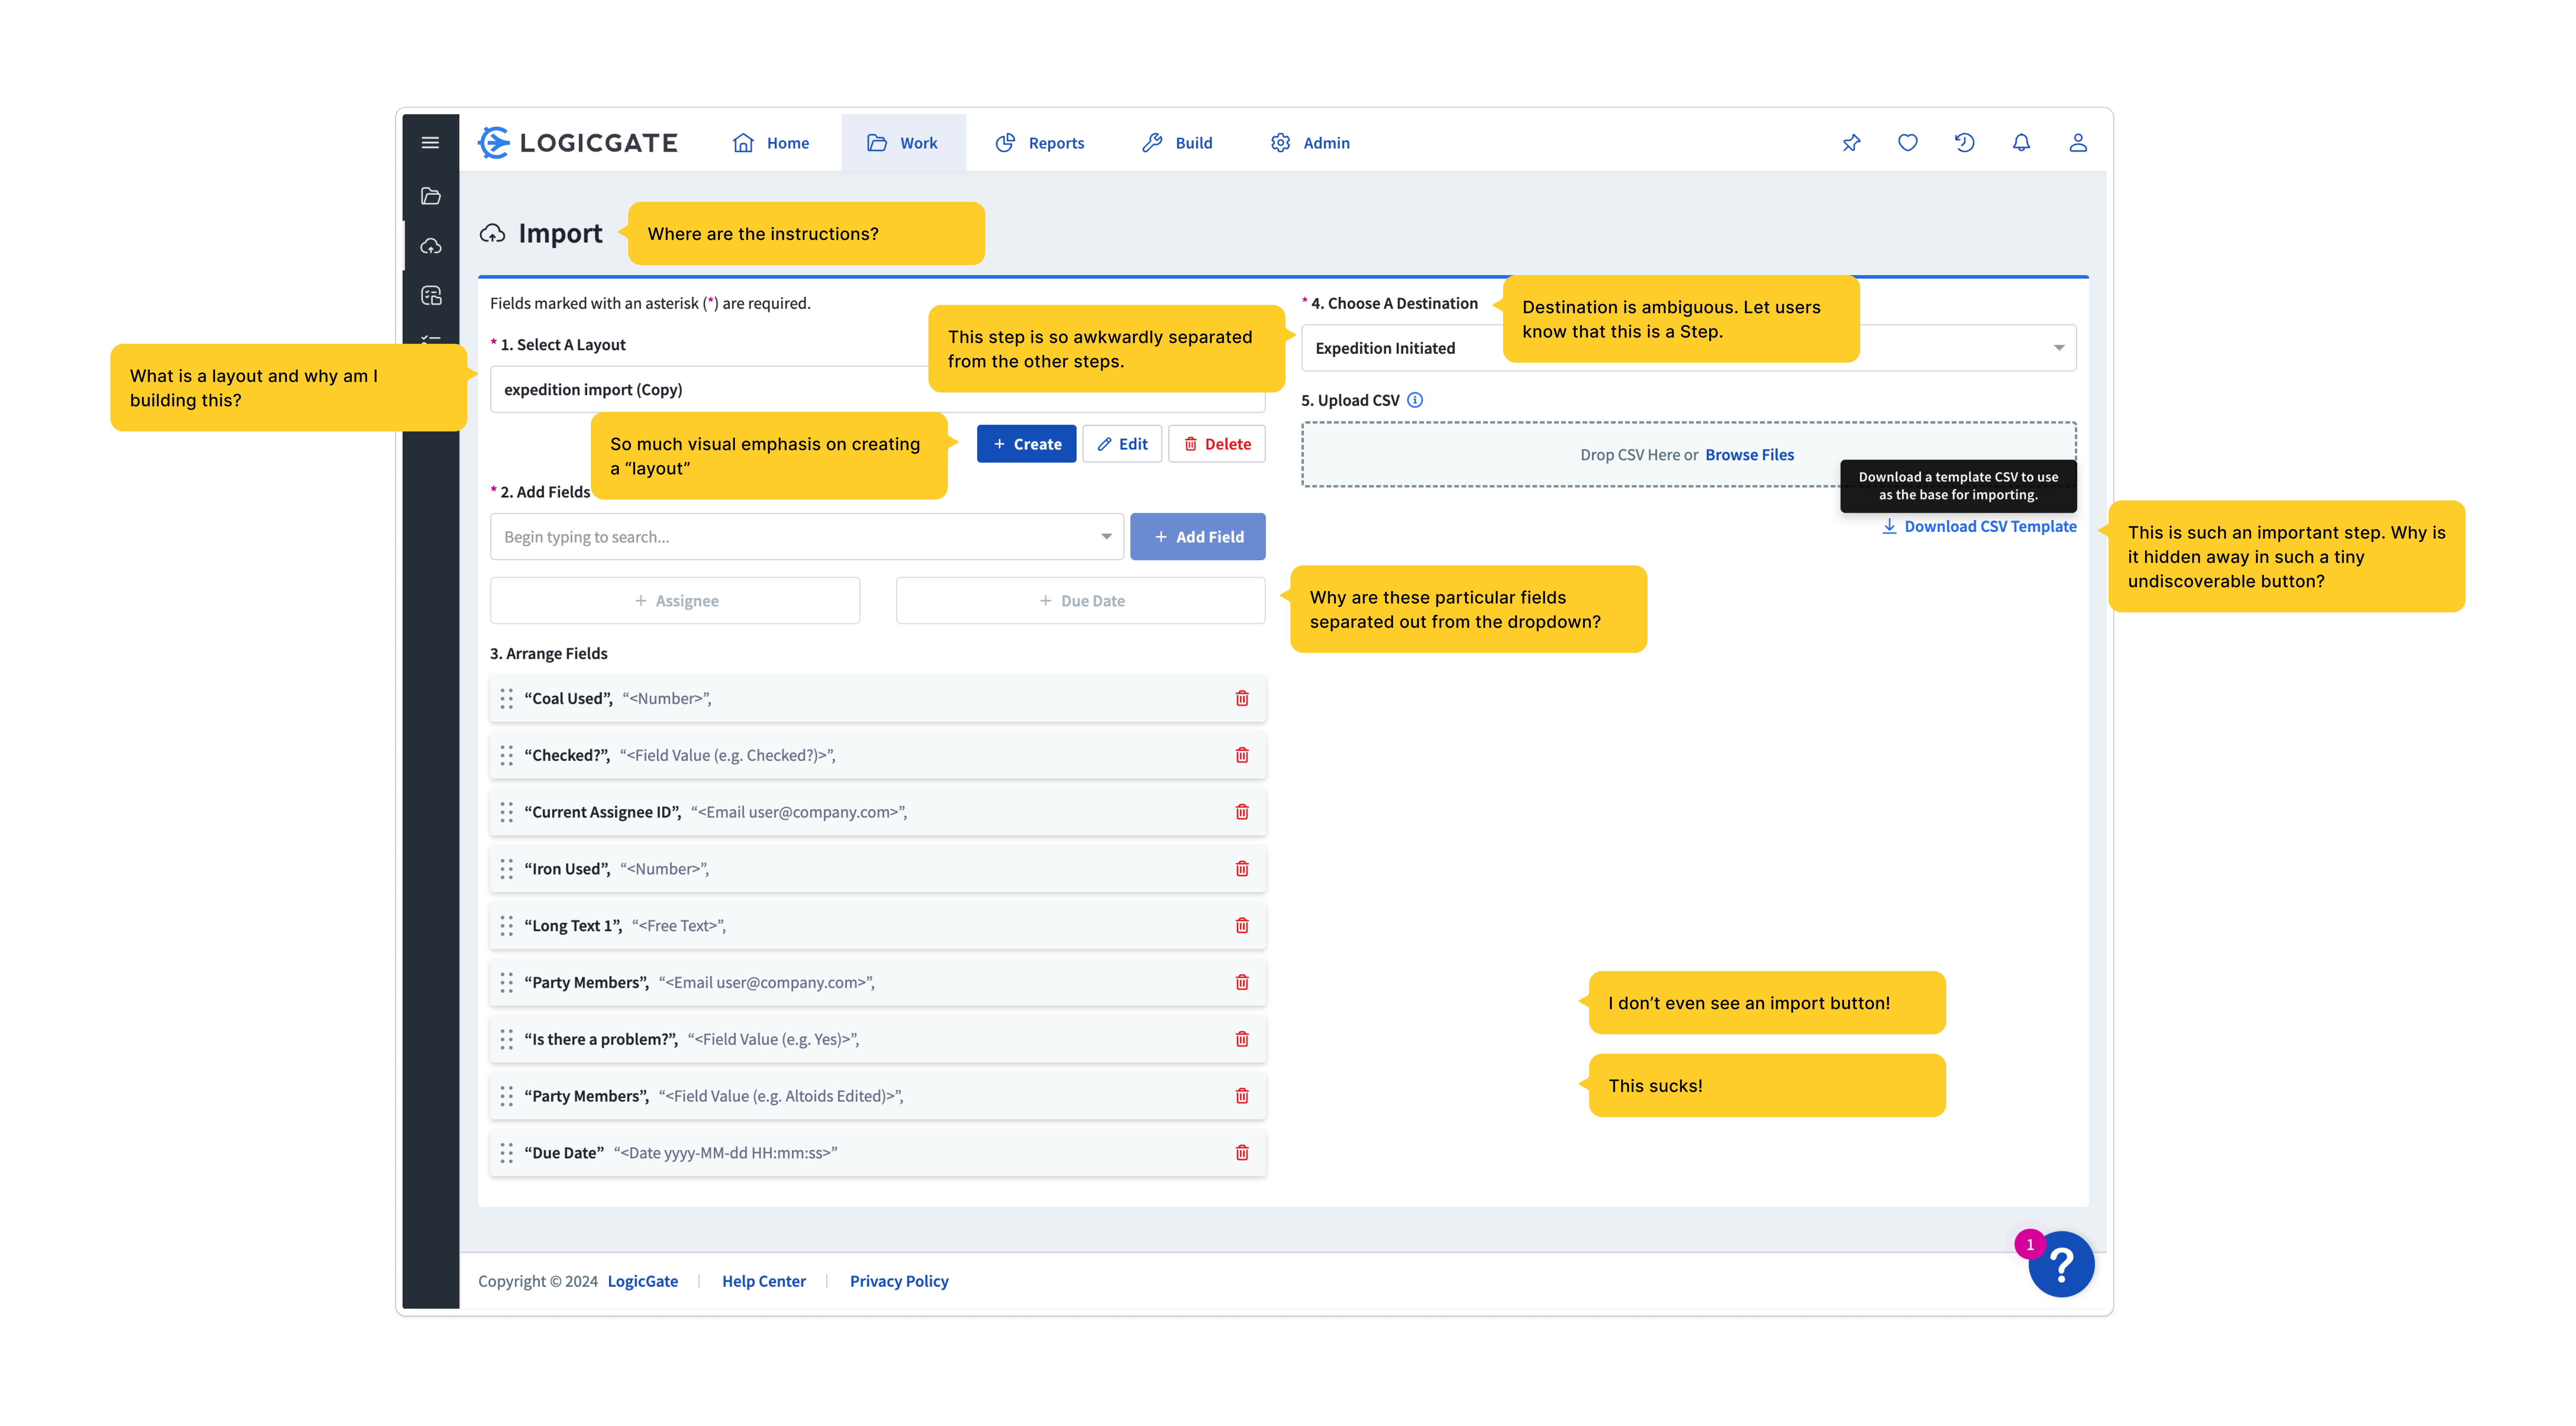
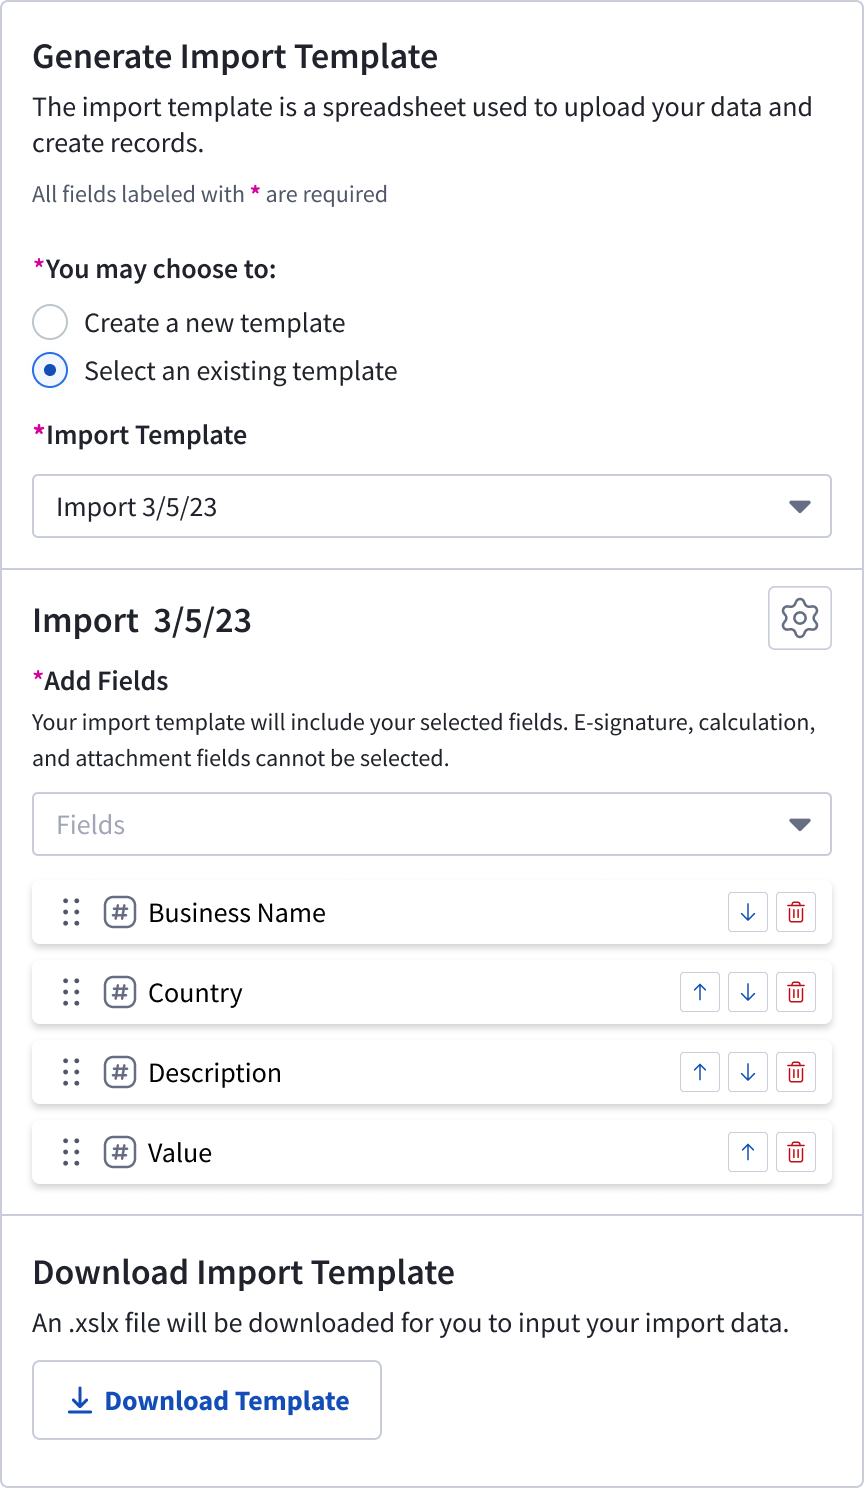
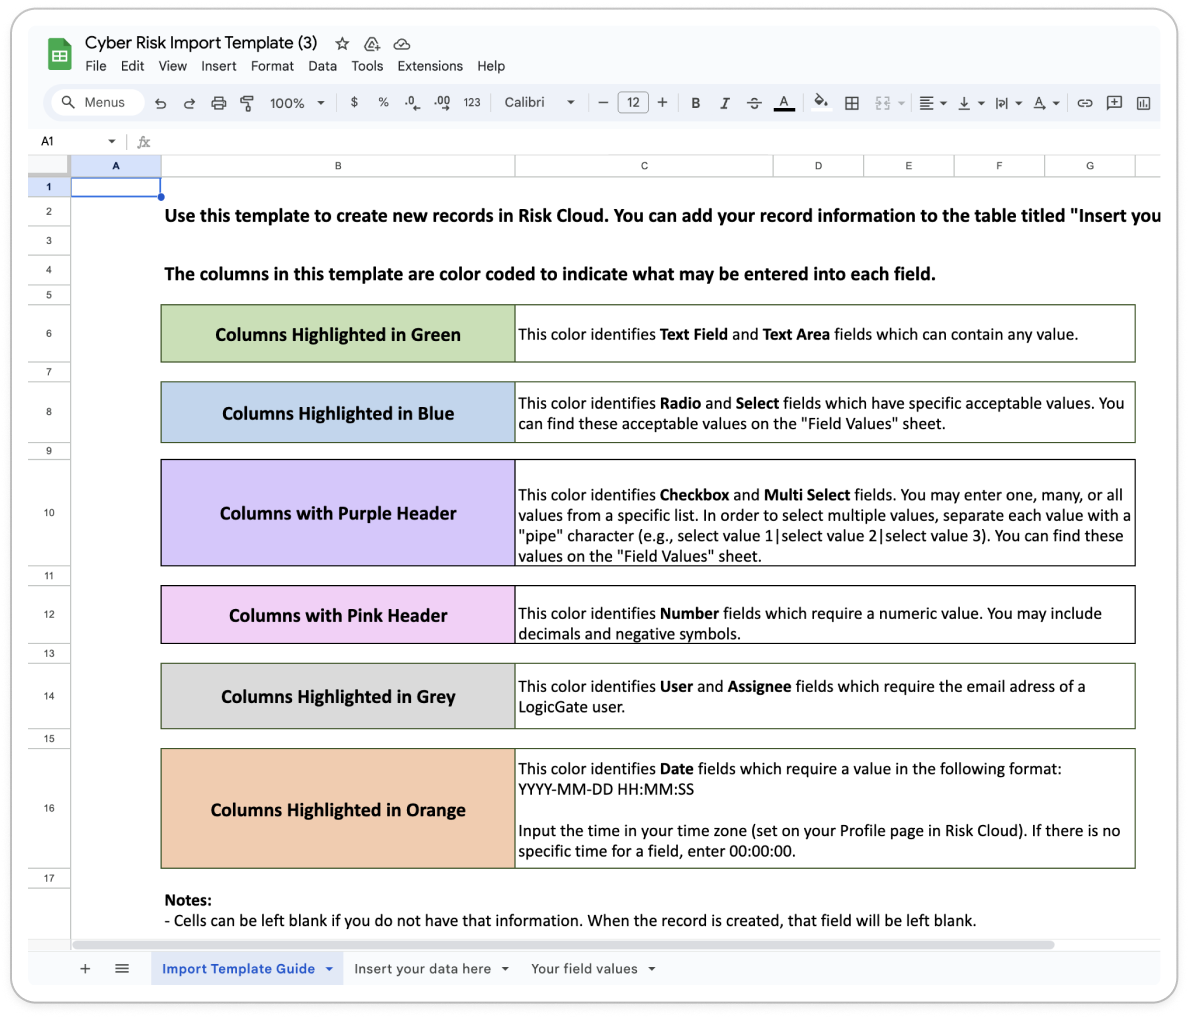
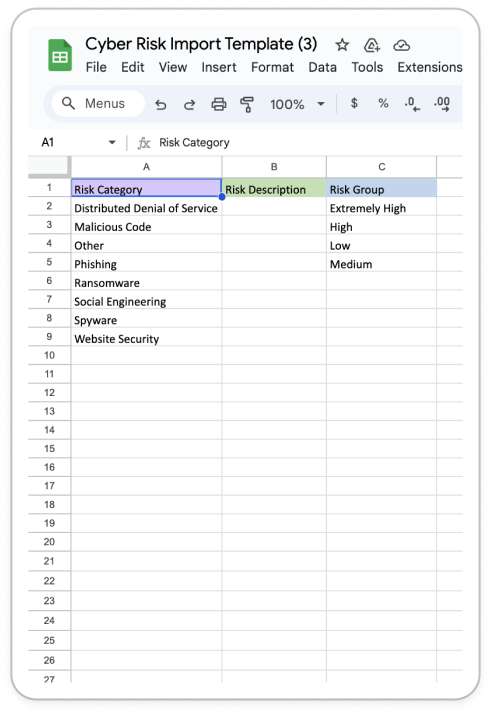
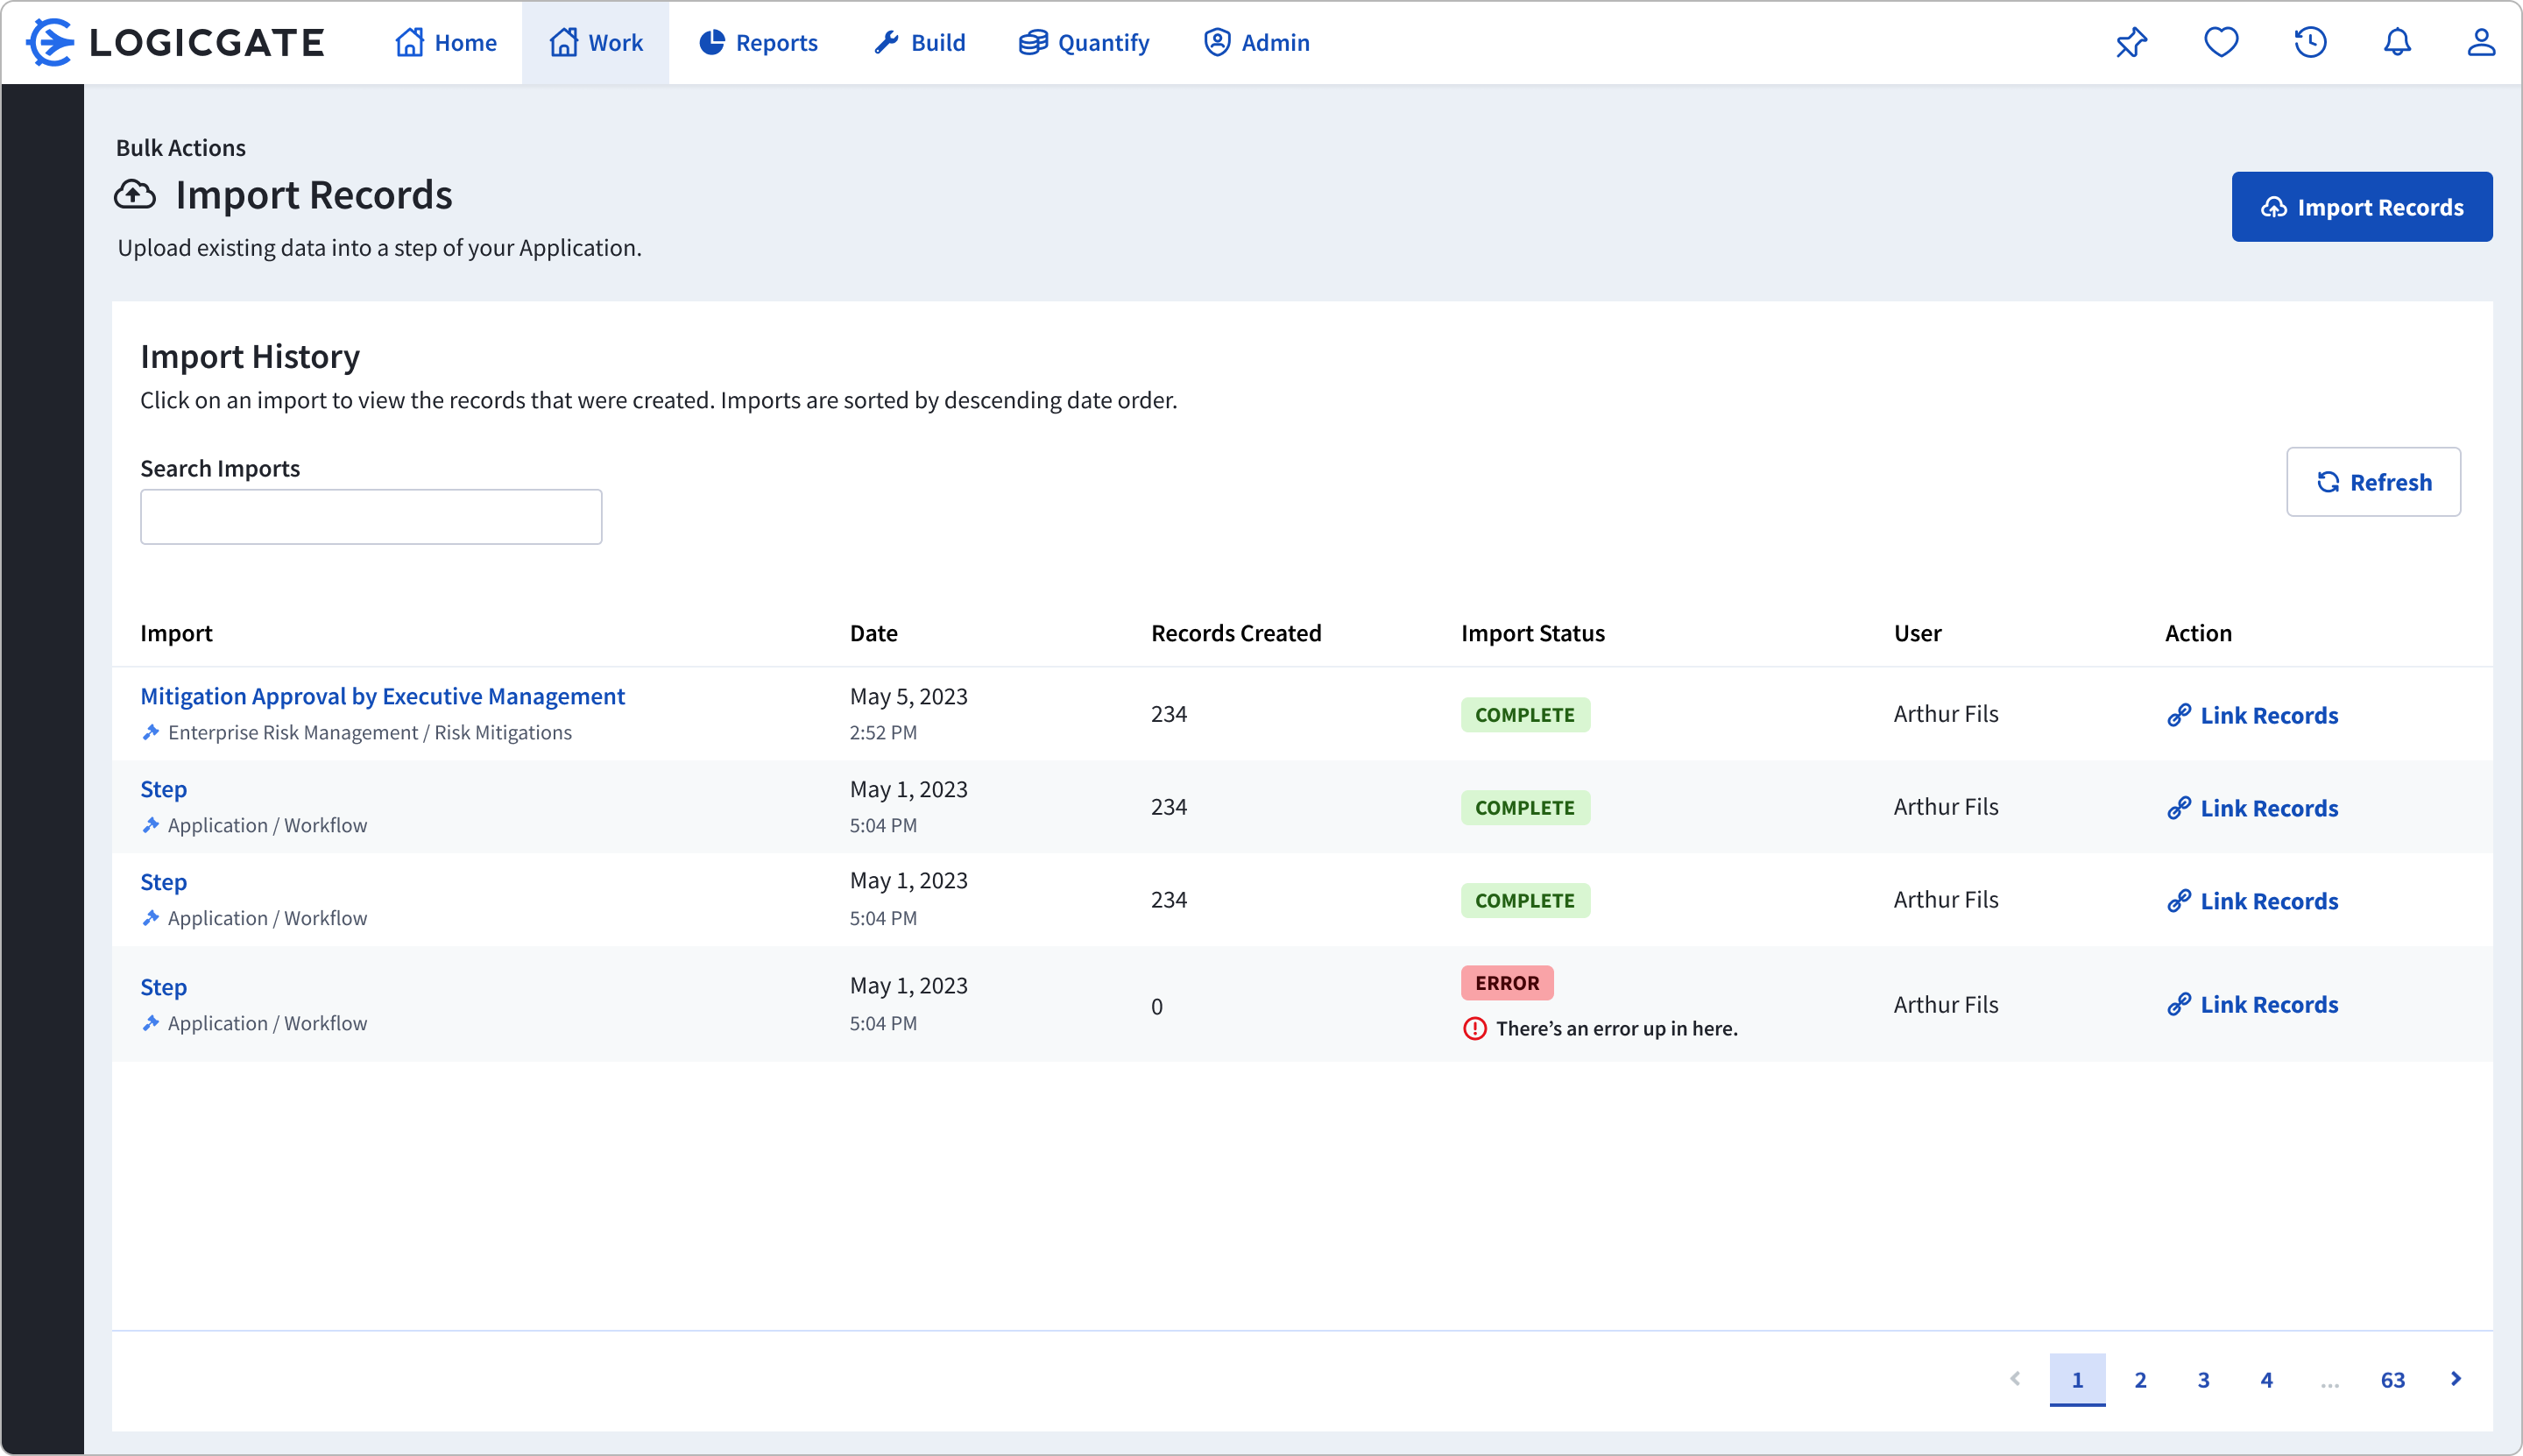
In Step 2, users needed to generate an import template, which would serve as a bridge to take data from spreadsheet software to Risk Cloud. These were previously labelled as "layouts", a name that was confusing and had ambiguous meaning to the user. In addition to renaming it to "import template", we took added additional guidance to explain to users why they were creating these templates.

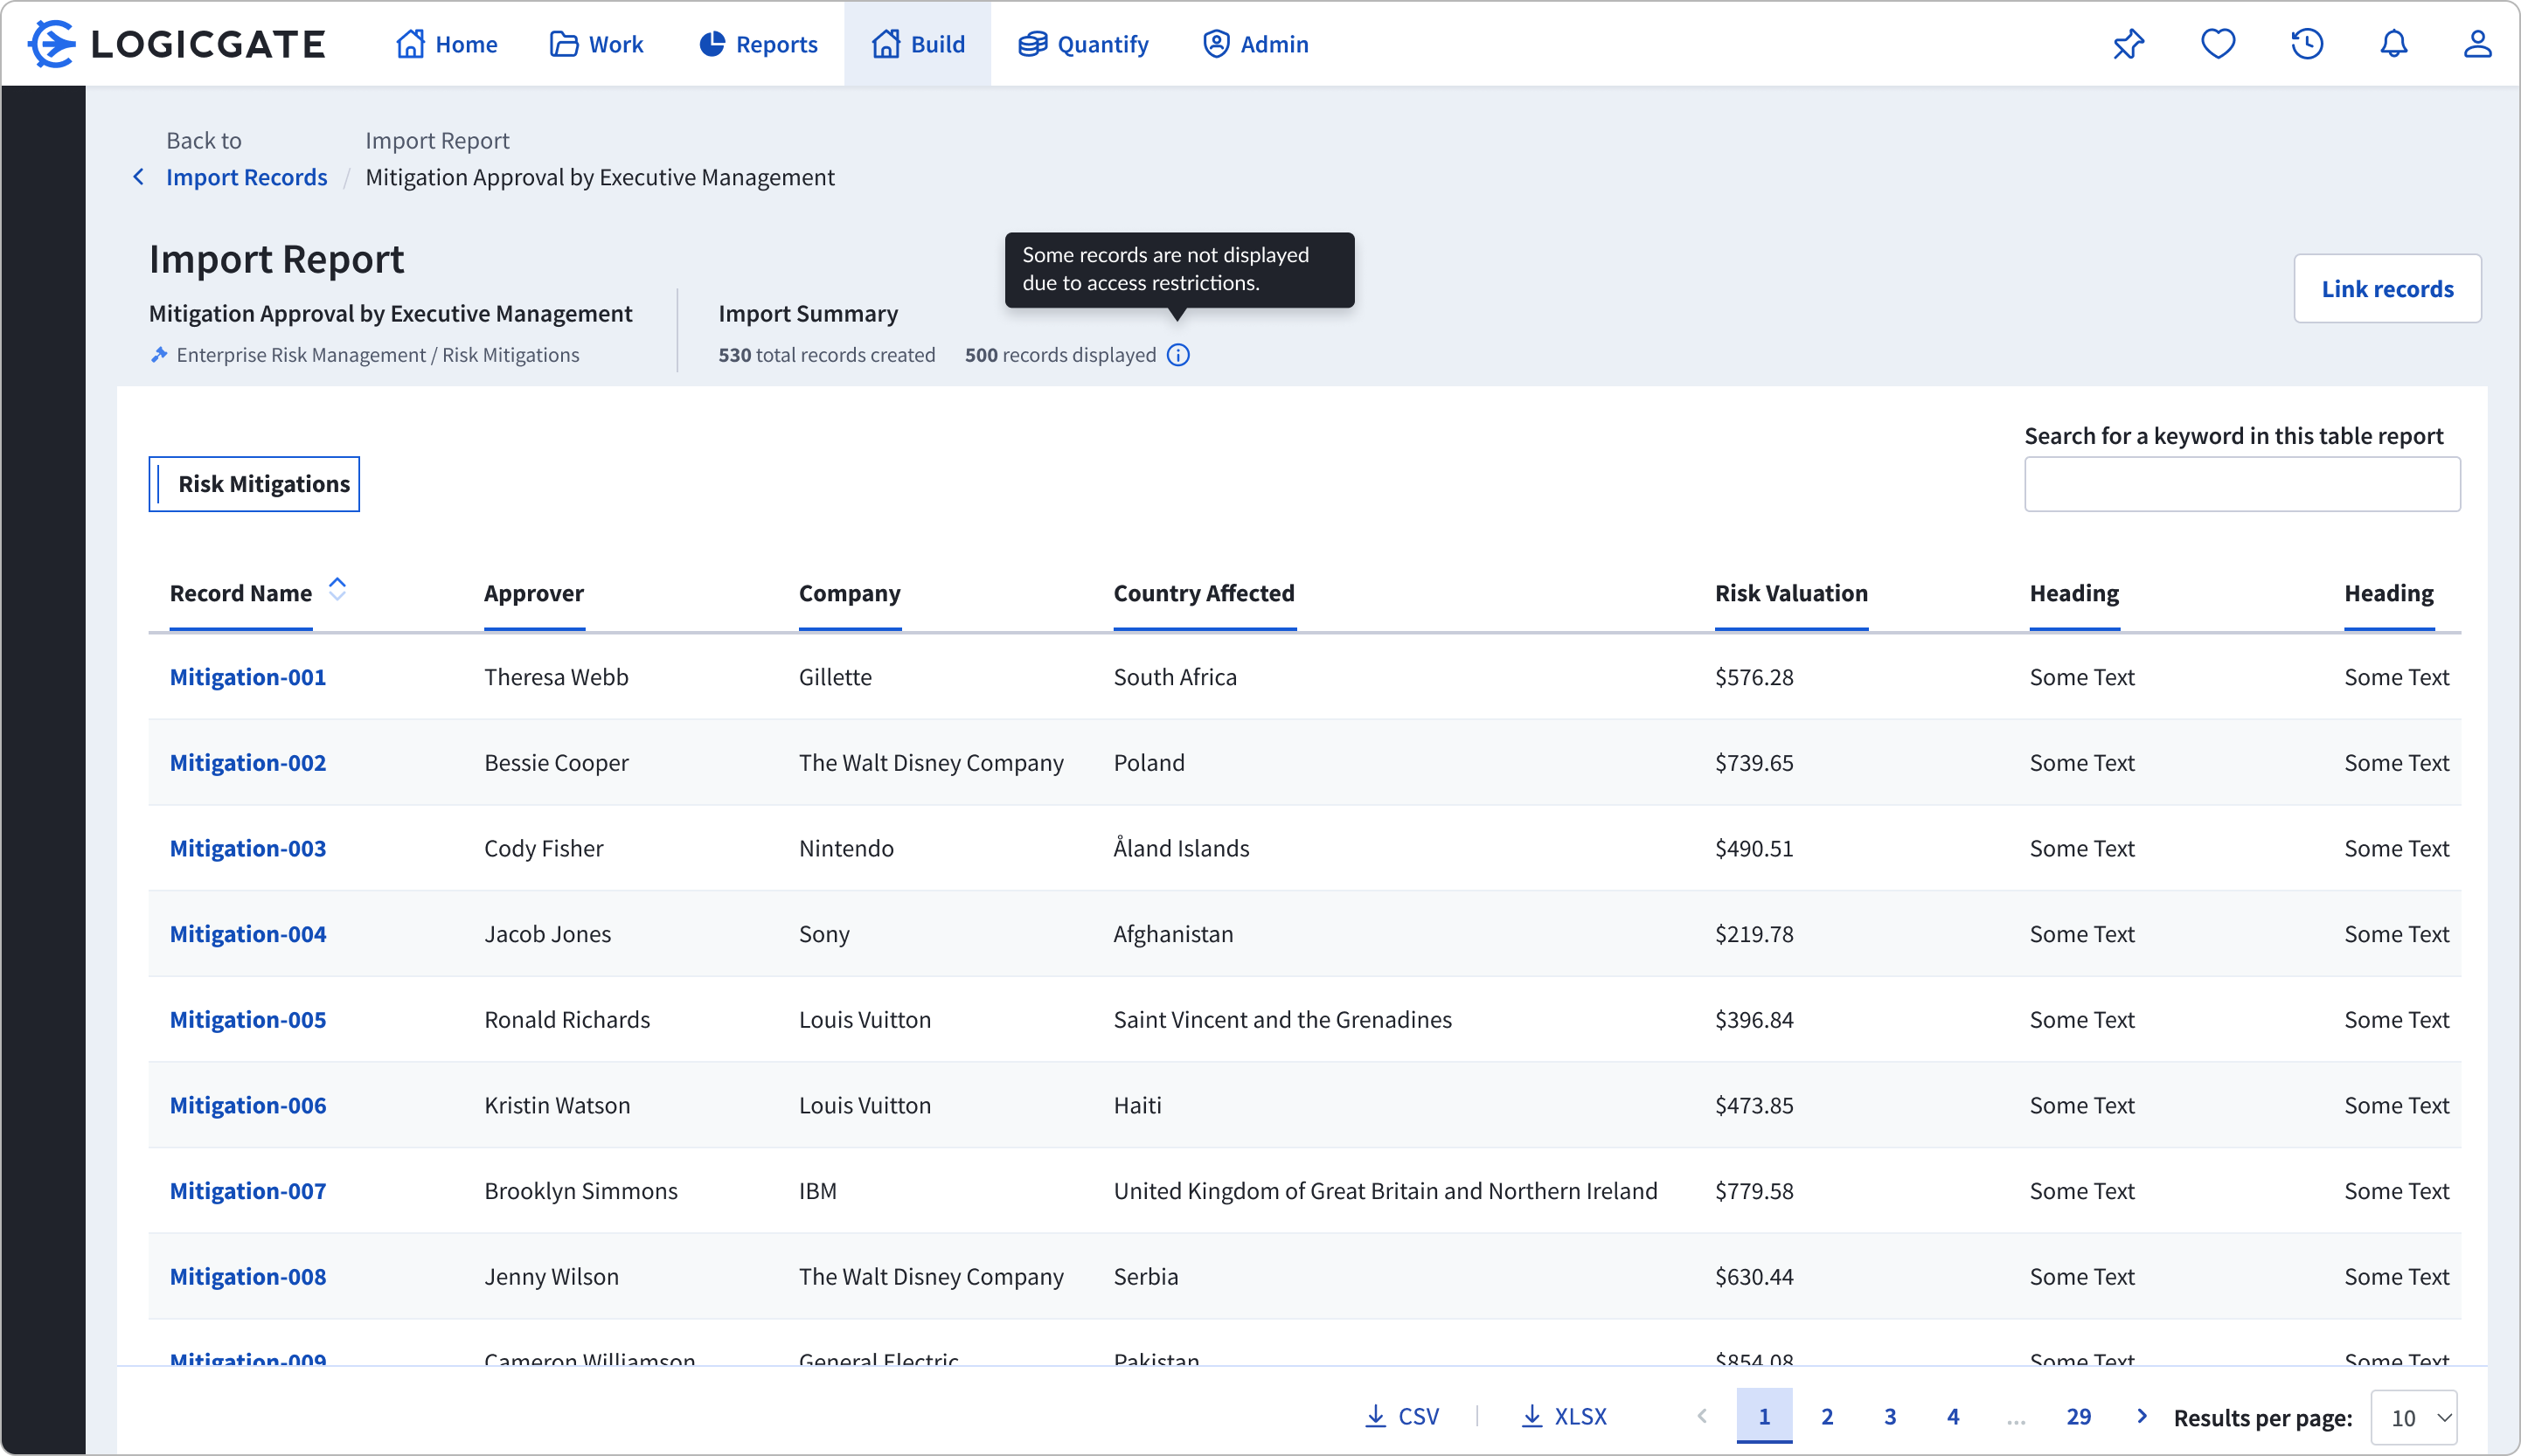
I designed this step to split into two user flows depending on the type of user they are: a default path for beginners, and a quicker advanced path for returning users. New users who are importing for the first time do not have existing import templates set up and so the first default path guides them through a process of creating an import template. These templates are then saved for repeated use later on.

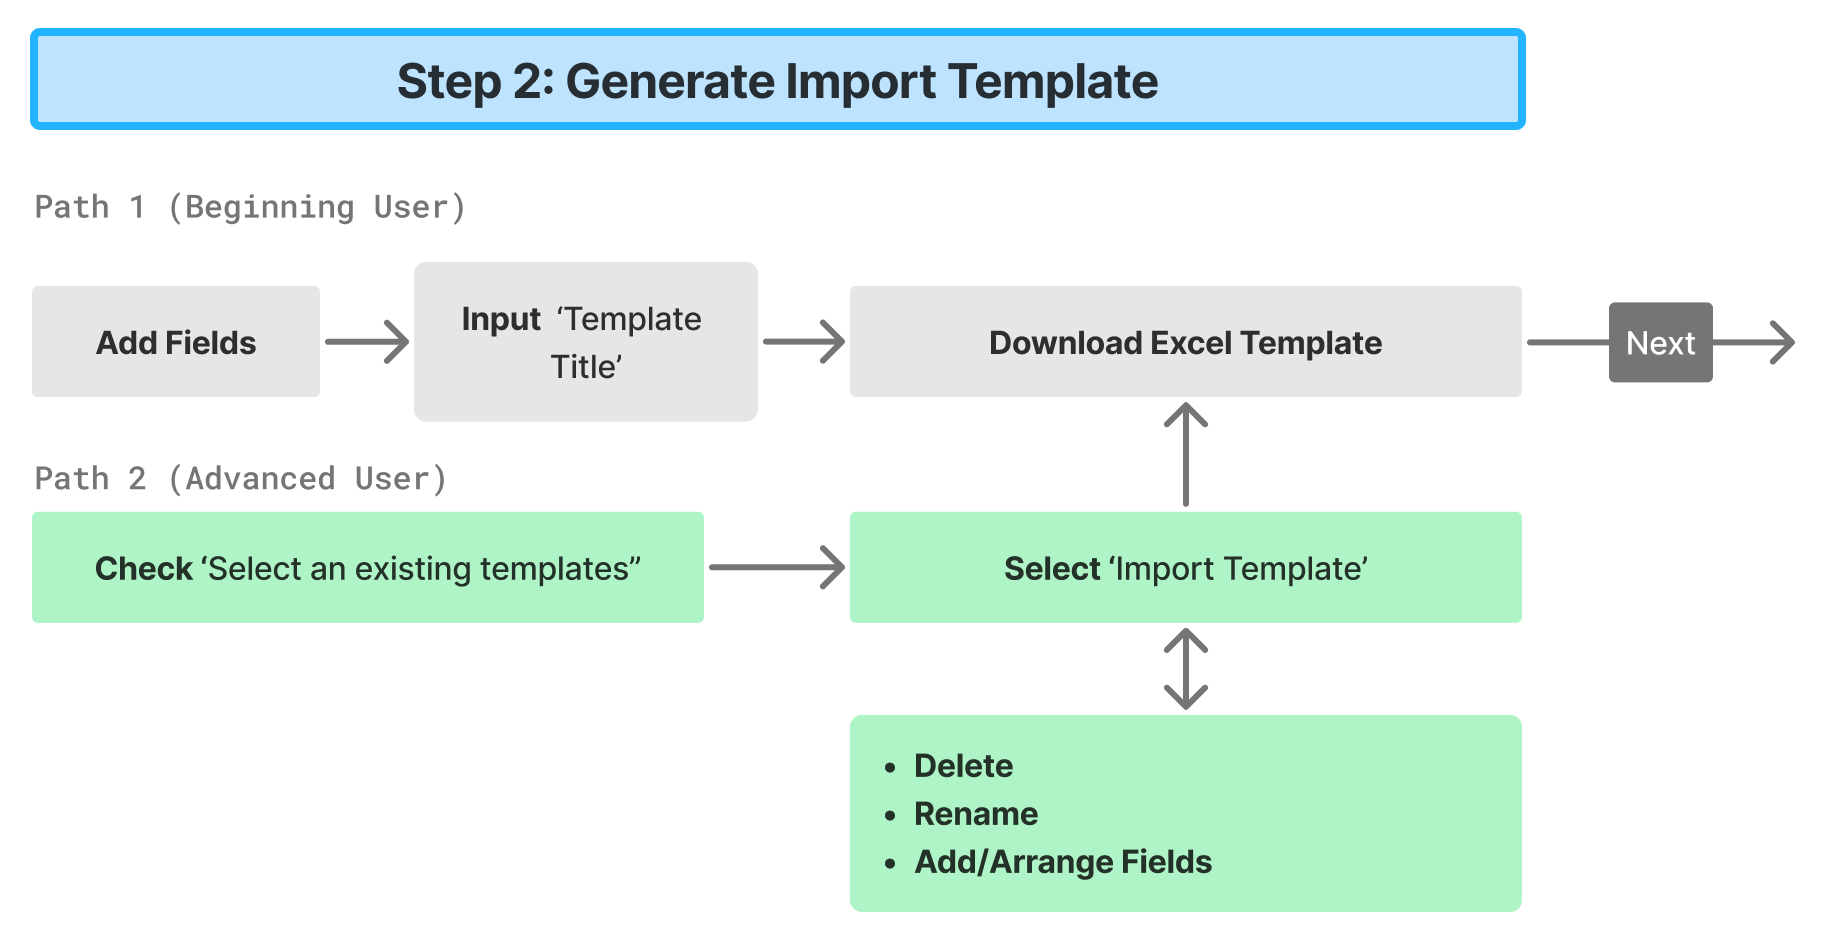
Returning users who need to make repeated imports rely on existing import templates to save time. The alternate “advanced user” path allows them to quickly select and download their pre-existing template, saving them time.

Making the import template useful

After creating or selecting their import template, users could download their import templates to input their data. In the previous version, when users downloaded import templates, they received a near blank .csv file with only the data field names listed. Without any guidance on the import template, many users dropped off at this point out of confusion of what to do next.

In addition, some data fields required very specific formatting to be imported successfully. The only reference to that was in the Risk Cloud UI, which was not easily discoverable and required users to reference two windows at once. It was nearly impossible for users to successfully import data at this stage.

Previous, this was the only form of formatting guidance.

We needed to significantly buff up the guidance on the import template if we wanted any chance of having users successfully importing on their own. Working together with the professional services team, we created an Import Template guide.

On the first page, we detailed a comprehensive manual to guide the user on where and how to input their data correctly. Each data type was color coded to help users easily reference between the instruction and data sheet.

For data types with specific selection values, we included a sheet that programmatically listed out all of the applicable selection values for each column. Users could now centrally reference the correct data values they could input, rather than having to reference Risk Cloud for that information.

Left: New Import Template Guidance
Right: Field values provided for select data types.

With the new import template design, Users could now work centrally within the excel sheet and reference clear instructions on how to input and format their data. This cleared all confusion and greatly reduced the drop-off rate of users undergoing their import process.

Step 3: Upload and validate data

The added guidance helped significantly improve the success rate of populating import templates but could not guarantee that the import files were fully error-free. In the previous versions, when users uploaded import templates, we would communicate to users that “errors were found”, a general error message that lacked any context on how to fix the errors.

To guarantee a fully error-free upload, I designed the last step's UX to serve as a validation feedback loop. It communicates to the user the exact details of the status of their import template. If the validation process finds errors in the import template, Risk Cloud programmatically generates an annotated version of their import template, detailing where the errors existed and how to fix them.

Above:Diagram of the new user flow for the validation step.
The newly annotated spreadsheet feature allowed users to identify cells had errors and how to fix them.

Impact

This feedback loop guaranteed users were creating records without errors in Risk Cloud, eliminating a lot of the confusion and anxiety of the previous version. This design also communicated clarity to users throughout the process to fix their errors before records were created, and eliminated the frustrating pain point of having to fix their records post import.

When user testing these designs, this specific step of the experience was the most compelling to our participants and its immediate value was championed as the most impactful.

Instances of communicating errors and success during validation.

Transitioning back to Risk Cloud

A pain point we learned during research interviews was that after imports were completed, there was no way to see the newly imported records in one place. Furthermore, there was no historical log of what imports had taken place either. This made users uncertain if their import was actually successful, and they had to make their own table reports to verify if the records had been created.

To retain a sense of continuum after the main import UX, I designed two pages: the Import History page, which serves as a ledger of all of the imports that were made in Risk Cloud, and the Import Report page, a table that consolidated all of the records that were created via an import.

Above: The Import History table keeps a ledger of all imports made in Risk Cloud. This page serves as both the beginning and end point for the user.
The import report allows users to view a consolidated table of all records created in a singular import.  

Results and reflection

Though this feature has not released publicly yet, we debuted the importer internally and through our Agility user conference and already have heard great results.

Redesigning the importer surfaced new challenges that I had not encountered before. To design for users that had a preconceived mental model of an experience  challenged me to deeply understand the user's conception with much more clarity before diving into the design process. In addition, there existed a pre-existing technical scaffolding around the functionality, which posed constraints that I had to work around in order for the feature to seamlessly transition from the previous version to the next. Working with the developers closely, the final design changed significantly throughout the process, but ultimately we came to an optimal solution on both ends.